
Here you have to select Pindah2 to import excel file with names, jantina, kaum and kelas together with the exam marks for all subjects. After you select Pindah2, you have to navigate via Window to search the excel file with the name TING_1.xls. Once you found it, select it and click Pilih button. The import file will be displayed in a temporary file of the system. If it is confirmed that the content is correct, you can close it.
After you select Pindah2, you have to navigate via Window to search the excel file with the name TING_1.xls. Once you found it, select it and click Pilih button. The import file will be displayed in a temporary file of the system. If it is confirmed that the content is correct, you can close it.
Once you Exit the data entry screen, system will prompt you if you want to remove the marked record for deletion.
Click Ok button to accept. The marked record will then be removed. You can now go to the next step Import ke fail kelas. Select Import2.
Once you do that, the data will be brought into the file TING_1.DBF. This will be your TOV, which resides in your headcount folder where you want to prepare Headcount. Make sure you pick it when you search for TOV.
After you had successfully imported your excel file into the system file of the name TING_1.DBF, you can then use this file as your TOV. You need to run the proses and Analisis again to make sure all the grades are in for all the subject marks. The Analisis will generate RESU_1.TMP for you to do HC5. Remember that it is created in the headcount folder where you do the import. Your search for TOV should be in the same folder where you prepare headcount.

Save the excel file with the same class name in the same folder where you login. You can then go to the folder to open it to shift the subject columns to follow the subject order of this year.
Next is to login to the headcount folder of F2. Select any class to go in and in Menu Utiliti, go to Bina fail to build a file with the name TING_1 to represent F1 combined file. Select the combined file to go into the system. It is blank. You can now import your Excel file that you had created earlier into it.

Go to Data > Pindah Dari Excel > Data Excel > Pindah data dari Excel. (See diagram below)

When using WinPMR65 or WinSPM65, many schools have problem in preparing headcount when they make changes in the subject order in the setup. For headcount to be successfully implemented, they were advised to preserve the subject order. However, sometime there is a need to change the order based on current needs.
I would like to explain how subject order in the setup can be altered by not following the subject order of the previous year when importing TOV, using Final Exam results of the previous year.
This can be done via Excel file since in Excel, user can insert and shift columns around with ease.
You have to note down the new order of subjects before you start to shift around the columns in Excel.
The following procedure uses WinPMR65 as an example. The example makes use of F1 combined file as TOV for preparing headcount for the current year F2.
First login to the Final Exam folder of the previous year and select the combined file.


 Posted by Koh Teng Gee
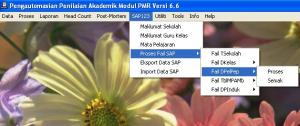

